| Host | Subdomain | Domain | IP | Subnet | Mac Address | OS | CPU | Ram | HDD |
|---|---|---|---|---|---|---|---|---|---|
#Post Installation Commands
                        sudo dnf install -y epel-release
                        sudo dnf update -y
                        sudo systemctl restart
#Setup XRDP for Remote Access from Home Network
                        sudo dnf install -y xrdp tigervnc-server
                        sudo systemctl enable --now xrxp
                        sudo firewall-cmd --zone=public --permanent --add-port=3389/tcp
                        sudo firewall-cmd --reload
#Download git
sudo dnf install -y git
Create nodes and firewall vm to the predefined specifications above.
Create reservations in the firewall lan dhcp pool for each node in your cluster as well as the services, bootstrap, and bastion.
#Clone Repository
                        cd
                        git clone https://github.com/joshthesystemsengineer/okdclusterdeployment.git
                        cd OKD-Cluster
#Install Bind (DNS)
sudo dnf -y install bind bind-utils
#Copy the named config files and zones
                        cd bind
                        sudo cp named.conf /etc/named.conf
                        sudo cp named.conf.local /etc/named/
                        sudo mkdir /etc/named/zones
                        sudo cp db* /etc/named/zones
#Enable and start named
                        sudo systemctl enable named
                        sudo systemctl start named
                        sudo systemctl status named
#Create firewall rules
                        sudo firewall-cmd --permanent --add-port=53/udp
                        sudo firewall-cmd --reload
#Change the DNS on the services node NIC that is attached to the VM Network (not OKD) to 127.0.0.1
#Restart the network services on the services VM
sudo systemctl restart NetworkManager
#Test DNS on the services
                        dig okd. labcluster.com
                        dig –x 10.0.0.2
#Install HAProxy - Load Balancer
                        cd ..
                        cd haproxy
                        sudo dnf install haproxy -y
                        sudo cp haproxy.cfg /etc/haproxy/haproxy.cfg
#Start, enable, and verify HA Proxy service
                        sudo setsebool -P haproxy_connect_any 1
                        sudo systemctl enable haproxy
                        sudo systemctl start haproxy
                        sudo systemctl status haproxy
#Add OKD firewall ports
                        sudo firewall-cmd --permanent --add-port=6443/tcp
                        sudo firewall-cmd --permanent --add-port=22623/tcp
                        sudo firewall-cmd --permanent --add-service=http
                        sudo firewall-cmd --permanent --add-service=https
                        sudo firewall-cmd --reload
#Install Apache/HTTPD
                        sudo dnf install -y httpd
                        sudo sed -i 's/Listen 80/Listen 8080/' /etc/httpd/conf/httpd.conf
                        sudo setsebool -P httpd_read_user_content 1
                        sudo systemctl enable httpd
                        sudo systemctl start httpd
                        sudo firewall-cmd --permanent --add-port=8080/tcp
                        sudo firewall-cmd --reload
#Test Webserver
curl localhost:8080
#Download the openshift-installer and oc client. You can download these from online and transfer from download folder to /usr/local/bin/
#Generate SSH Key
ssh-keygen
#Create an install directory and copy the install-config.yaml file
                        cd
                        mkdir install_dir
                        cp /OKD-Cluster/cluster-yaml/install-config.yaml ./install_dir
#Edit the install-config.yaml in the install_dir. Insert your pull secret and ssh key made in previous ssh-keygen step You can use a pull secret for another private registry. If you do not need the cluster to pull images from a private registry you can use {"auths":{"fake":{"auth":"aWQ6cGFzcwo="}}} as the pull secret when prompted during the installation. Make sure to take a backup of the install-config.yaml it will be deleted in the next step
                        vim ./install_dir/install-config.yaml
                        cp ./install_dir/install-config.yaml ./install_dir/install-config.yaml.bak
#Generate the Kubernetes manifests for the cluster, ignore the warning
openshift-install create manifests --dir=install_dir/
#Prevent Pods from being scheduled on the control plane machines
sed -i 's/mastersSchedulable: true/mastersSchedulable: False/' install_dir/manifests/cluster-scheduler-02-config.yml
#Create the ignition-configs
openshift-install create ignition-configs --dir=install_dir/
#Create okd directory in /var/www/html
sudo mkdir /var/www/html/okd
#Copy the install_dir contents to /var/www/html/okd
                        sudo cp -R install_dir/* /var/www/html/okd/
                        sudo chown -R apache: /var/www/html/
                        sudo chmod -R 755 /var/www/html/
#Test the webserver
curl localhost:8080/okd/metadata.json
# Start the core os vm and hit tab before it boots. Then you hit space and start typing each of these lines and put a space between each one.
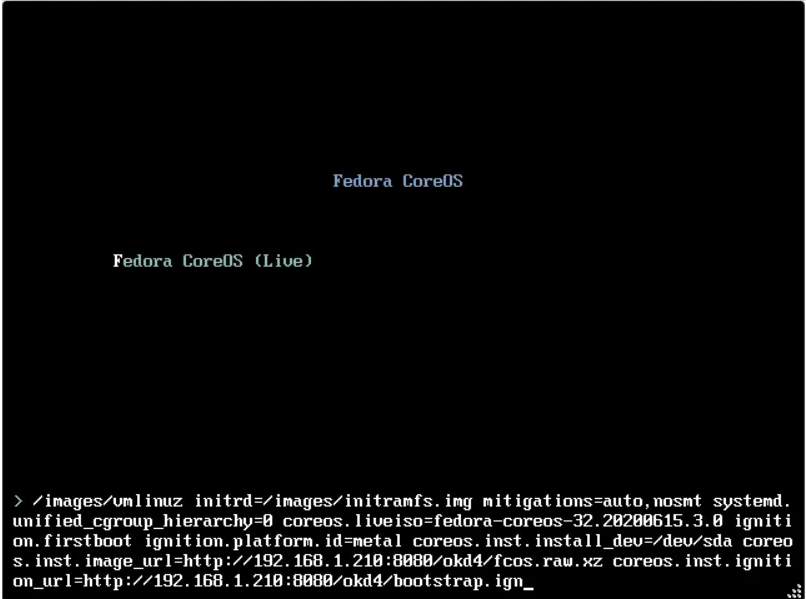
# Bootstrap
                    coreos.inst.install_dev=/dev/sda
                    coreos.inst.image_url=http://10.0.0.2:8080/okd/fcos.raw.xz
                    coreos.inst.ignition_url=http://10.0.0.2:8080/okd/bootstrap.ign
# Control
                    coreos.inst.install_dev=/dev/sda
                    coreos.inst.image_url=http://10.0.0.2:8080/okd/fcos.raw.xz
                    coreos.inst.ignition_url=http://10.0.0.2:8080/okd/master.ign
# Worker
                    coreos.inst.install_dev=/dev/sda
                    coreos.inst.image_url=http://10.0.0.2:8080/okd/fcos.raw.xz
                    coreos.inst.ignition_url=http://10.0.0.2:8080/okd/worker.ign
# Monitor bootstrap installation
openshift-install --dir=install_dir/ wait-for bootstrap-complete --log-level=info
# Once the bootstrap process is complete, which can take upwards of 30 minutes, you can shutdown your bootstrap node. Now is a good time to edit the /etc/haproxy/haproxy.cfg, comment out the bootstrap node, and reload the haproxy service.
                    sudo sed '/ bootstrap /s/^/#/' /etc/haproxy/haproxy.cfg
                    sudo systemctl reload haproxy
                    export KUBECONFIG=install_dir/auth/kubeconfig
                    oc whoami
                    oc get nodes
                    oc get csr
#You should only see the master nodes and several CSR’s waiting for approval. Install the jq package to assist with approving multiple CSR’s at once time.
                    wget -O jq https://github.com/stedolan/jq/releases/download/jq-1.6/jq-linux64
                    chmod +x jq
                    sudo mv jq /usr/local/bin/
                    jq --version
#Approve all the pending certs and check your nodes
oc get csr -ojson | jq -r '.items[] | select(.status == {} ) | .metadata.name' | xargs oc adm certificate approve
#Check the status of the cluster operators.
oc get clusteroperators
#Get your kubeadmin password from the install_dir/auth folder and login to the web console
cat install_dir/auth/kubeadmin-password
#Open your web browser to https://console-openshift-console.apps.okd.labcluster.com and login as kubeadmin with the password from above
#Login to your services VM and begin to set up an NFS server
                            sudo dnf install -y nfs-utils
                            sudo systemctl enable nfs-server rpcbind
                            sudo systemctl start nfs-server rpcbind
                            sudo mkdir -p /var/nfsshare/registry
                            sudo chmod -R 777 /var/nfsshare
                            sudo chown -R nobody:nobody /var/nfsshare
#Create an NFS Export
echo '/var/nfsshare 10.0.0.0/8(rw,sync,no_root_squash,no_all_squash,no_wdelay)' | sudo tee /etc/exports
#Restart the nfs-server service and add firewall rules
                            sudo setsebool -P nfs_export_all_rw 1
                            sudo systemctl restart nfs-server
                            sudo firewall-cmd --permanent --zone=public --add-service mountd
                            sudo firewall-cmd --permanent --zone=public --add-service rpc-bind
                            sudo firewall-cmd --permanent --zone=public --add-service nfs
                            sudo firewall-cmd --reload
#Registry configuration
                            oc create -f /OKD-Cluster/cluster-yaml/registry_pv.yaml
                            oc get pv
#Edit the image-registry operator
oc edit configs.imageregistry.operator.openshift.io
#Change the managementState: from Removed to Managed. Under storage: add the pvc: and claim: blank to attach the PV and save your changes automatically
                            managementState: Managed
                            storage:
                            pvc:
                            claim:
#Check your persistent volume, and it should now be claimed
oc get pv
#Check the export size, and it should be zero. In the next section, we will push to the registry, and the file size should not be zero.
du -sh /var/nfsshare/registry
#Create WordPress Project
                            oc new-project wordpress-test
                            oc new-app centos/php-73-centos7~https://github.com/WordPress/WordPress.git
                            oc expose svc/wordpress
                            oc new-app centos/mariadb-103-centos7 --name mariadb --env MYSQL_DATABASE=wordpress --env MYSQL_USER=wordpress --env MYSQL_PASSWORD=wordpress
#Open the OpenShift console and browse to the WordPress-test project.
#Click on the WordPress object and click on the route to open it in your web browser.
#The kubeadmin is a temporary user. The easiest way to set up a local user is with htpasswd.
                            cd
                            cd /OKD-Cluster/cluster-yaml
                            htpasswd -c -B -b users.htpasswd testuser testpassword
#Create a secret in the openshift-config project using the users.htpasswd file you generated
oc create secret generic htpass-secret --from-file=htpasswd=users.htpasswd -n openshift-config
#Add the identity provider
oc apply -f htpasswd_provider.yaml
#Give yourself cluster-admin access
oc adm policy add-cluster-role-to-user cluster-admin testuser
#If you can not login with this you may have to login via the cli like I did to force it to make an account. I used the following command to login then I was about to log back in as kubeadmin and run this.
oc login -u testuser
#Server [https://localhost:8443]: https://openshift.example.com:6443
#The server uses a certificate signed by an unknown authority.
#You can bypass the certificate check, but any data you send to the server could be intercepted by others.
#Use insecure connections? (y/n): y
#Authentication required for https://openshift.example.com:6443 (openshift)
#Username: user1
#Password:
#Login successful.
#You don't have any projects. You can try to create a new project, by running
# oc new-project
                            oc login -u kubeadmin
                            oc adm policy add-cluster-role-to-user cluster-admin testuser
named.conf
                                // named.conf
                                //
                                // Provided by Red Hat bind package to configure the ISC BIND named(8) DNS
                                // server as a caching only nameserver (as a localhost DNS resolver only).
                                //
                                // See /usr/share/doc/bind*/sample/ for example named configuration files.
                                //
                                // See the BIND Administrator's Reference Manual (ARM) for details about the
                                // configuration located in /usr/share/doc/bind-{version}/Bv9ARM.html

                                    options {
                                    listen-on port 53 { 127.0.0.1; 10.0.0.2; };
                                    #   listen-on-v6 port 53 { ::1; };
                                    directory   "/var/named";
                                    dump-file   "/var/named/data/cache_dump.db";
                                    statistics-file "/var/named/data/named_stats.txt";
                                    memstatistics-file "/var/named/data/named_mem_stats.txt";
                                    recursing-file  "/var/named/data/named.recursing";
                                    secroots-file   "/var/named/data/named.secroots";
                                    allow-query     { localhost; 10.0.0.0/8; };

                                        /*
                                     - If you are building an AUTHORITATIVE DNS server, do NOT enable recursion.
                                     - If you are building a RECURSIVE (caching) DNS server, you need to enable recursion.
                                     - If your recursive DNS server has a public IP address, you MUST enable access
                                          control to limit queries to your legitimate users. Failing to do so will
                                          cause your server to become part of large scale DNS amplification
                                          attacks. Implementing BCP38 within your network would greatly
                                          reduce such attack surface
                                        */
                                        recursion yes;

                                        forwarders {
                                          8.8.8.8;
                                          8.8.4.4;
                                        };

                                        dnssec-enable yes;
                                        dnssec-validation yes;

                                        /* Path to ISC DLV key */
                                        bindkeys-file "/etc/named.root.key";

                                        managed-keys-directory "/var/named/dynamic";

                                        pid-file "/run/named/named.pid";
                                        session-keyfile "/run/named/session.key";
                                };

                                  logging {
                                    channel default_debug {
                                      file "data/named.run";
                                      severity dynamic;
                                };
                                  };

                                  zone "." IN {
                                      type hint;
                                      file "named.ca";
                                  };

                                include "/etc/named.rfc1912.zones";
                                include "/etc/named.root.key";
                                include "/etc/named/named.conf.local";
named.conf.local
                                zone "10.in-addr.arpa" {
                                  type master;
                                  file "/etc/named/zones/db.okd.labcluster ;
                                };
                                zone "10.in-addr.arpa" {
                                  type master;
                                  file "/etc/named/zones/db.10";
                                ;}
db.okd.labcluster.com
                                zone "labcluster.com" {
                                  type master;
                                  file "/etc/named/zones/db.okd.labcluster.com;
                                };

                                zone "10.in-addr.arpa" {
                                  type master;
                                  file "/etc/named/zones/db.10;
                                };
db.10
                                $TTL 1W
                                @ IN SOA ns1.labcluster.com.	root (
                                2025041800	; serial
                                3H		; refresh (3 hours)
                                30M		; retry (30 minutes)
                                2W		; expiry (2 weeks)
                                1W )		; minimum (1 week)
                                IN	NS	ns1.labcluster.com.
                                ;
                                2.0.0.10.in-addr.arpa.	IN	PTR	api.okd.labcluster.com.
                                2.0.0.10.in-addr.arpa.	IN	PTR	api-int.okd.labcluster.com.
                                2.0.0.10.in-addr.arpa.  IN      PTR     services.okd.labcluster.com.
                                ;
                                9.0.0.10.in-addr.arpa.	IN	PTR	bootstrap.okd.labcluster.com.
                                ;
                                3.0.0.10.in-addr.arpa.	IN	PTR	control-plane1.okd.labcluster.com.
                                4.0.0.10.in-addr.arpa.	IN	PTR	control-plane2.okd.labcluster.com.
                                5.0.0.10.in-addr.arpa.	IN	PTR	control-plane3.okd.labcluster.com.
                                ;
                                6.0.0.10.in-addr.arpa.	IN	PTR	compute1.okd.labcluster.com.
                                7.0.0.10.in-addr.arpa.	IN	PTR	compute2.okd.labcluster.com.
                                8.0.0.10.in-addr.arpa.	IN	PTR	compute3.okd.labcluster.com.
                                ;
                                ;EOF
haproxy.cfg
                                global
                                   log         127.0.0.1 local2
                                   pidfile     /var/run/haproxy.pid
                                   maxconn     4000
                                   daemon
                                defaults
                                   mode                    http
                                   log                     global
                                   option                  dontlognull
                                   option http-server-close
                                   option                  redispatch
                                   retries                 3
                                   timeout http-request   10s
                                   timeout queue           1m
                                   timeout connect         10s
                                   timeout client          1m
                                   timeout server          1m
                                   timeout http-keep-alive 10s
                                   timeout check           10s
                                   maxconn                 3000
                                listen api-server-6443
                                   bind *:6443
                                   mode tcp
                                   option  httpchk GET /readyz HTTP/1.0
                                   option  log-health-checks
                                   balance roundrobin
                                   server bootstrap bootstrap.okd.labcluster.com:6443 verify none check check-ssl inter 10s fall 2 rise 3 backup
                                   server control-plane1 control-plane1.okd.labcluster.com:6443 weight 1 verify none check check-ssl inter 10s fall 2 rise 3
                                   server control-plane2 control-plane2.okd.labcluster.com:6443 weight 1 verify none check check-ssl inter 10s fall 2 rise 3
                                   server control-plane3 control-plane3.okd.labcluster.com:6443 weight 1 verify none check check-ssl inter 10s fall 2 rise 3
                                listen machine-config-server-22623
                                   bind *:22623
                                   mode tcp
                                   server bootstrap bootstrap.okd.labcluster.com:22623 check inter 1s backup
                                   server control-plane1 control-plane1.okd.labcluster.com:22623 check inter 1s
                                   server control-plane2 control-plane2.okd.labcluster.com:22623 check inter 1s
                                   server control-plane3 control-plane3.okd.labcluster.com:22623 check inter 1s
                                listen ingress-router-443
                                   bind *:443
                                   mode tcp
                                   balance source
                                   server compute1 compute1.okd.labcluster.com:443 check inter 1s
                                   server compute2 compute2.okd.labcluster.com:443 check inter 1s
                                   server compute3 compute3.okd.labcluster.com:443 check inter 1s
                                listen ingress-router-80
                                   bind *:80
                                   mode tcp
                                   balance source
                                   server compute1 compute1.okd.labcluster.com:80 check inter 1s
                                   server compute2 compute2.okd.labcluster.com:80 check inter 1s
                                   server compute3 compute3.okd.labcluster.com:80 check inter 1s
install-config.yaml
                                apiVersion: v1
                                baseDomain: labcluster.com
                                metadata:
                                  name: okd

                                compute:
                                - hyperthreading: Enabled
                                  name: worker
                                  replicas: 0

                                controlPlane:
                                  hyperthreading: Enabled
                                  name: master
                                  replicas: 3

                                networking:
                                  clusterNetwork:
                                  - cidr: 172.20.0.0/14
                                    hostPrefix: 23
                                  networkType: OpenShiftSDN
                                  serviceNetwork:
                                  - 192.168.0.0/16

                                platform:
                                  none: {}

                                fips: false

                                pullSecret: '{"auths":{"fake":{"auth":"aWQ6cGFzcwo="}}}'
                                sshKey: 'ssh-ed25519 @host'
registry_pv.yaml
                                    apiVersion: v1
                                    kind: PersistentVolume
                                    metadata:
                                      name: registry-pv
                                    spec:
                                      capacity:
                                        storage: 100Gi
                                      accessModes:
                                        - ReadWriteMany
                                      persistentVolumeReclaimPolicy: Retain
                                      nfs:
                                        path: /var/nfsshare/registry
                                        server: 10.0.0.2